Yes, again, SORRY! But, this should be the last time! I now have my own domain! www.theeversocraftymom.com AND a new look!
What you need to know-
There will be two changes. The first is simply the domain. You will now find me at www.theeversocraftymom.com
The second thing that will happen (although you will only notice it when you come to my blog) is that the look of the layout will be changing. I am going to be switching from blogspot to wordpress in the next few months and the basic layout and look will change.( It will be the SAME domain www.theeversocraftymom.com).
I am super excited about working with wordpress. When it is finished and activated you will find quite an update to the look, as well as a much easier navigation and LOTS more fun stuff for all you crafty and fun loving people! :D
Also, I would love to keep in touch via facebook, twitter & instagram! Come find me!
facebook - facebook.com/eversocraftymom or search The Ever So Crafty Mom
twitter @eversocraftymom
Instagram @theeversocraftymom

Wife of a Texas Marine, Mama to a sweet baby girl, crafter, baker, decorator, seamstress...
Showing posts with label Life. Show all posts
Showing posts with label Life. Show all posts
Tuesday, August 27, 2013

Big Sister Photoshoot! -We are having another baby!
BIG SISTER!
Yes! Alicia is a big sister!
We are so excited to share our news and ask for you to please keep us in your prayers!
I had a feeling, even before we knew for sure, that there was another sweet baby growing inside of me. I was so sure in fact, that I took these photos more than a week before finding out!


I have been trying to get some fun photos at the beginning of every month. I'm definitely no pro, but I hope to get better over time, and, I LOVE doing it ;D So, these pictures are in fact, Alicia's 5 month photos. These two sweethearts will be 14 months apart, and we couldn't be more thrilled.
I am hoping to be better about week-by-week photos (I think I started being consistent with Alicia at about 4 months in), and I am really wanting to write a little "bump journal" as well. I think it would be such a precious keepsake.
happy sigh...It is all still sinking in. I am not sure if miscarrying our first is making me cautious about letting it sink in, or if the fact that I am still waiting for the dreaded morning sickness to set in that it is making it hard for me to fully grasp that another sweet baby is growing inside of me.
We talked about whether or not to let others know this early in the pregnancy, but, whatever God has planned for this little one, we decided we want to let others know about the blessing of this sweet soul and celebrate his/her life from the very beginning.
Early Days...
So far, I've had random nausea spurts- mostly when I'm uncomfortably hot, and when there is nothing on my stomach...so I've been snacking, a lot... ;-)
The most noticeable changes have been a super heightened sense of smell (even more than with Alicia), constant hunger, occasional nausea spurts, and my belly isn't going down like it was before ;-). I was just a few lbs away from my pre-pregnancy weight when we found out :P :-)
I plan on trying to exercise more this round (hoping and praying). Getting a routine down seems to be the hardest thing for me. Any of you mommas have a few good tricks to staying in shape during pregnancy? What things did you try and make sure to get in everyday? What exercises did you find helped with back pain? (I can tell mine is already starting)
Thank you for all your best wishes and prayers! We truly appreciate each and every one!
Yes! Alicia is a big sister!
We are so excited to share our news and ask for you to please keep us in your prayers!
I had a feeling, even before we knew for sure, that there was another sweet baby growing inside of me. I was so sure in fact, that I took these photos more than a week before finding out!

I have been trying to get some fun photos at the beginning of every month. I'm definitely no pro, but I hope to get better over time, and, I LOVE doing it ;D So, these pictures are in fact, Alicia's 5 month photos. These two sweethearts will be 14 months apart, and we couldn't be more thrilled.
I am hoping to be better about week-by-week photos (I think I started being consistent with Alicia at about 4 months in), and I am really wanting to write a little "bump journal" as well. I think it would be such a precious keepsake.
happy sigh...It is all still sinking in. I am not sure if miscarrying our first is making me cautious about letting it sink in, or if the fact that I am still waiting for the dreaded morning sickness to set in that it is making it hard for me to fully grasp that another sweet baby is growing inside of me.
We talked about whether or not to let others know this early in the pregnancy, but, whatever God has planned for this little one, we decided we want to let others know about the blessing of this sweet soul and celebrate his/her life from the very beginning.
Early Days...
So far, I've had random nausea spurts- mostly when I'm uncomfortably hot, and when there is nothing on my stomach...so I've been snacking, a lot... ;-)
The most noticeable changes have been a super heightened sense of smell (even more than with Alicia), constant hunger, occasional nausea spurts, and my belly isn't going down like it was before ;-). I was just a few lbs away from my pre-pregnancy weight when we found out :P :-)
I plan on trying to exercise more this round (hoping and praying). Getting a routine down seems to be the hardest thing for me. Any of you mommas have a few good tricks to staying in shape during pregnancy? What things did you try and make sure to get in everyday? What exercises did you find helped with back pain? (I can tell mine is already starting)
Thank you for all your best wishes and prayers! We truly appreciate each and every one!
Thursday, August 15, 2013
Organizing & Cleaning Inspiration! - My Pinterest To-Do list ;-)
Well, I am still determined to get organized, and I thought I would share some things that are helping to inspire and motivate me to get it done! I've picked 4 areas that I really want to master in our apartment before I move onto other things...
#1
My Thinking Spot

#2
Utilize My Small Spaces
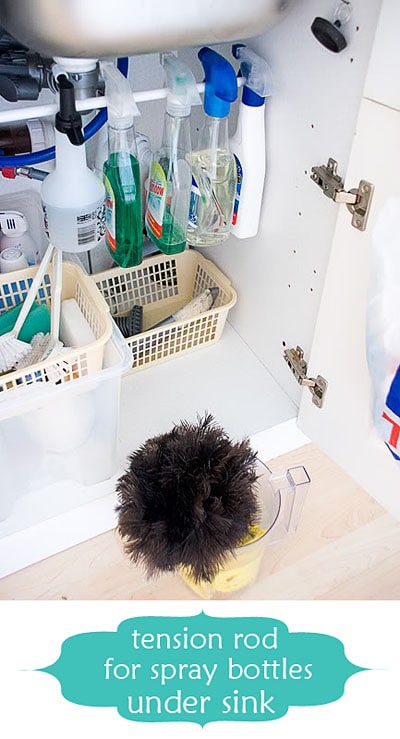
In any home the art of using your space wisely is something to master, but I think this is especially true if you live in an apartment. I am so thankful that we have quite a few closets in our place, unfortunately, they seem to fill up way to quickly!
Something I've noticed in almost all homes and apartments is that the space under counters and sinks is always huge and has FEW-to-NO shelves for storage. This leads to lots of unused, wasted space, but it doesn't have to be if you know how to get creative with it! Little stand up shelves, stacked baskets, or tension rods like in the picture above free up space and help keep things organized and accessible. I am hoping to give some ideas like this a try in each bathroom and in the kitchen. Might post a picture with the finished product ;-)
#3
Clean & Tidy Fridge

The fridge...that small area of your home that you wish would just stay clean, because honestly, who enjoys cleaning the fridge? I've been wanting to figure out a few ways to make it harder for the fridge to become dirty, and while I've been using a container idea like this for a while, I am planning on using more, almost like drawers, to save space and keep my fridge a little cleaner.
#4
Consistency With My Cleaning

I have been terrible about doing a little cleaning here and there to cut down on the amount that needs done at once. I end up needing a big cleaning day.
I love this cleaning schedule by tipsandpix. It is so much more manageable to know what you are doing and on what day so that you don't become overwhelmed with everything all at once. I will let you know how it goes!
More organizing ideas can be found on my pinterest board, Get Organized!! Make sure to check out some of my other boards for cleaning (Look at board, Handy Home Help) and other fun DIY ideas!
#Babylove

Baby date :D She couldn't take her eyes off of him. haha :D
Weekend is only one day away! Enjoy!
Wednesday, August 7, 2013
How To Make Your Own Printables! FREE!

You've seen printables everywhere. If you have photoshop (I should say, if you have it and know how to navigate the designing aspects of photoshop) then you can make yourself pretty much whatever kind of printable and design you like. But, if you are like me, and don't own photoshop, then you have to get creative, and you wont have quite so many options. But, you can still make yourself some fun and lovely printables, and I'm going to show you how!
I do most of my design work through a site called picmonkey. There is a lot you can do for free. If you want to get full use of all their features then you do pay a little, but it is very inexpensive.
Here are a few examples of some very simple party printables that I did in under 5 minutes (each) using the free features.


These are fun for snack or goodie bags.
They also have some cute things to make printables for boys.


Here is how to make your very own!
First, go to www.picmonkey.com
You will see that you have two options, you can 'edit a photo', or 'create a collage'.
If you want to add text to a picture, simply go to 'Edit a Photo' and upload the picture you want to work on. Once it is on the site you will see all of your options for editing on the left side of the screen.
THE PHOTO EDITING ICONS
Click on the first icon to crop, rotate, re-size etc.
The Second to add an effect to the whole picture.
The Third icon allows you to do detail touch-ups, like teeth whitening and removing blemishes.
The Fourth is where you add text boxes. You can add as many as you like.
The Fifth is where you get shapes, labels and graphics.
The sixth allows you to add a border or frame to your picture.
The Seventh lets you change the texture.
and the Eighth lets you create a theme.
Now, if you want to completely use their graphics and create something new, go back to the main page and lick 'Create a Collage'.
There will be a default collage setting, but you can change that by clicking on the second icon and going through their options, or, you can scroll over that default collage and click the little "x" that is inside of each photo box (in the right corner) to delete some of the areas. In a like manner you can add more pictures by dragging a picture next to one of the existing boxes and dropping it there (it will take up half the space of the box next to it).
If you scroll over the lines in the collage you will see that you can change the size of any box to suite your needs.
Back to the icons
THE COLLAGE EDITING ICONS
So, the first one is where you download the pictures you want to use in your collage.
And the second one is where you can choose a collage style.
The Third one has an assortment of swatches that can become the background to your collage.
And the Fourth one changes the color of the background (don't have to use a swatch at all), and the shape of the photo boxes (you can round the edges).
If you want to use a plain white background, don't do a thing to the collage. Simply add your photos and go ahead to the photo editing. Likewise, if you want just a plain white surface to edit with graphics, then simply click 'create a collage' and then go straight to photo editing (don't even worry about sizing it here unless you want a specific size they offer).
To get to the Photo Editor from the Collage:
You will notice these options at the top of the collage page.
'Open' 'Save' 'Share' 'Edit' 'Auto fill' 'Clear All'
Cick 'Edit'. This will take you from the collage section, to the photo editing section.
You will see that you have a clean white board to begin your work. You can re-size (first icon), add text (Fourth icon), place graphics (Fifth icon), or do whatever you like from here, and when you are done, simply save it to where you want it on your computer,
and Whala! You have your very own printables (or anything else you want to use it for!)
Hope this helps some of you busy budgeting mamas! I know it can be frustrating to either not know how to make these fun things, or not have the means to buy them! I'm budgeting too!
Hopefully this will help some of you out!
If anything doesn't make sense or you need some additional help feel free to ask in the comments!
Enjoy!

Monday, July 29, 2013
Easy, Framed Shopping List Tutorial!
I've been a bad blogger this past week. Working on way to many projects at once and I can't seem to finish any and take a long enough break from everything else in life to sit down and post about them. So here is a simple DIY I did today. Pretty self explanitory, but here is a walk-through just in case!
Have a great week!

I
don't know about you, but I will think of half a dozen things to put on
my shopping list while I am cooking or cleaning and will forget about
them before I can find a pad and pen or my phone to write them down.
Something that worked well for me in my last apartment was to hang a
picture frame in (or right outside) the kitchen with a dry erase marker
and jot things down there whenever they came to mind.
Well,
I am going to be using the white picture frame I used then in my
daughters room and decided to put together my new one today. Here is
what I did :-)
What you need (so simple!):
1.Paper of choice to frame
(I printed out 'Shopping List' in a fun font on some light blue card stock)
2. Picture Frame
3. Cutting Board or scissors

1. Choose some stationary, scrapbook paper, or print off "shopping list" on some cardstock (Like I did. Download PDF and print here), or whatever you want to put in your frame.
2. Cut down to frame size. I usually do this by taking out the picture the frame comes with, measuring it or holding it up to what I'm framing and then cut accordingly.
3. Using everything that was already in the frame, simply place your piece in front. This will help keep it looking flat and crisp in your frame.
4. Select where you want to hang your easy to use shopping list! Then, grab a small dry erase maker and set it on top of the frame to make it quick and accessible when you want to jot down things you want to remember for your next shopping trip.
Enjoy!

I've got lots of big projects whirling in my head that I can't wait to work on and share!
What are some things you would like to see?
DIY/Tutorial for Sewing clothing or maybe a home Craft?
What are your needs or what do you want to know how to do?
Comment with requests and I will see if I can make them happen!
To finish off this tutorial I thought I would share something to make you smile.
Here's something for all the moms out there...:D Enjoy!
Friday, July 19, 2013
Crinkle Tag Toy Tutorial

My little girl loves things that make noise. Her favorite toys have been an empty water bottle that she pushes around, her wipes crackly plastic container (will refer to as wc from here on), and the large tag on her floor play mat. I've been keeping the containers after the wipes are all out and giving them to her to play with, and it is from them that I thought of this DIY.


1. Cut 7 pieces of ribbon, each 7"long (or however many at whatever length you desire)
2. Fold in half (right side OUT). On right side of fabric - measure 2 1/8"from each corner and place and pin a ribbon. On longest side measure 1 1/2" from either ribbon and place last ribbon. Pin the ribbons down to the center of the triangle so that they do not get in the way of sewing. Sew ribbons in place and remove outer pins only.
3. Place second half of triangle (right side down) over the ribbons side of other triangle. Pin & sew the two shorter sides, leaving the longest one open to place wc. Remove pins.

4. Remove the hard top of the wc (It should pull off fairly easily) and cut off the sides.
5. Take top corners and fold down, meeting in the center.
6. Fold bottom up, covering the corners you just folded down. (to get sizing correct, try placing inside the sewn triangle, make any needed adjustments)
7. Fold corners over and tape into place

8. Insert wc into the open side of the triangle.
9. Starting at center, turn edges under and pin together.
10. When you reach the end trim the point even with the edge.

11. Open the end with your finger and make sure seam is flat.
12. Turn corner to inside.
13. Finish folding edges under to the ends. Pin.
14. This is how it should look pinned and ready to sew. Starting at any corner, sew 3/8"seam all the way around.
Whala! You are done! Let your little one play away! :-)
Happy Baby, Happy Momma :-)
This is definitely the most detailed DIY I've done. I'm working with some new programs and still trying to learn how everything works, but I'm happy with the over all turnout on this one. I have several more that I am working on and excited to share! Thanks for stopping by!
Happy Sewing!
Tuesday, July 16, 2013
Find your spot, stop, and breathe!
I've been in a brain freeze the past week. Just too much going on inside my head and I haven't been able to organize it all. I have projects that I want to do for myself, projects around the apartment, and projects for my almost 5 month old. There's cleaning and organizing from kitchen to my bedroom closet that I need to do, boxes that still need to be unpacked and sorted through, and then there is the slightly overwhelming task of learning HTML & CSS that I have undertaken.

I love my carseat canopy cover I bought(left), but it is a little too warm for the TX heat and I decided to make a summer one(fabrics on right). Will show finished project & tutorial soon!
With all of these I have been finding it hard to remember to sit down and just enjoy my blog. Blogging might seem like one more thing on my list, something to put aside and maybe allow myself one less thing to worry about, but, in the stress of everything else, I have found that it is a terrific outlet. I love being a stay-at-home-mom (Ok, I beyond love it, I feel like I'm the luckiest girl in the world being able to be a stay-at-home-mom) and I love all my little tasks and duties, OK, maybe I don't love dishes and laundry, but I really do love having a clean apartment. But, with having a sanguine/choleric temperament I just have to get out sometimes, and, instead of actually going out and driving somewhere everyday, I can save the money on gas and the temptation of shopping and simply sit on my sofa with a cup of tea or coffee and unwind a bit by writing on my blog.

My blogging buddy- Aja (pronounced like Asia)
Now I wouldn't say that the learning HTML & CSS part is exactly relaxing...I would actually say that that part it is down right frustrating. No, the fun and relaxing part about blogging is that it makes me sit down and collect my thoughts. Even if I make myself sit for just a few minutes it helps all the ideas that have been buzzing in my head to start to untangle and I can begin to put them into some kind of order. Sometimes I simply create a bunch of titles for future blog posts from the ideas that are swirling around in my head. Even if I've only had 10 minutes to work on something and then the baby starts crying (which has been the story of late with her teething) I can start into my tasks again feeling just a little bit refreshed and just a little bit more sane. It's like a mini-meditation, only on the corporal needs instead of spiritual. Both are important!
On a regular day at home if I don't get my morning prayers in it will bug me all day and I won't feel settled or at peace until I say them. Just one rosary and a spiritual communion. That is all I need to feel like I can do anything...cause hey, I then have Mary the Mother of God and Christ in my corner...watch out dust and laundry, you shall be conquered! (or, something)

Besides the Indulgences attached to the Rosary, Our Lady revealed to St. Dominic and Blessed Alan de la Roche additional benefits for those who devoutly pray the Rosary. Our Lady's 15 Promises for those who pray the Rosary
Even if I don't get all the cleaning done, or I sleep in and have to get ready to leave for some reason and I don't have time to get my prayers in, I try to make myself remember to say one or all of the following throughout the day, "Jesus, meek and humble of heart, make my heart like unto thine.", "Jesus, I trust in you.", "Jesus and Mary I love you, save souls.".
Whenever I am frazzled or frustrated I try to pull out one of these. I just say it silently to myself. I know I have a temper at times and I know that these have held back my anger and made me more reasonable more than once. Just give it to God, ALL OF IT, all of life. I know I can't do it all and if I try it will end in tears, but, if I give it all to God then I know he will fill in all the areas where I fall short.

Couldn't resist. :-)
I have realized, especially in this past week or so, that I need to allow myself this little outlet of blogging. I've been pushing it aside in order to accomplish more of my other projects, but, I've been feeling the need to stop and breathe. I stopped in the middle of some sorting to write this post. I feel so much better already!
I am a new mom, haven't been at it long, my daughter is just 4 1/2 months old, but I know that I need to form habits now that I will be grateful for later, especially as our family grows. I have a tendency to over do it. Over plan, over think, and overwhelm myself. That's the story of my life, and I need to learn to balance (do you ever figure that balance out?). I have found that blogging is my spot, it's where I sort my ideas and organize my thoughts. So I'm making a new commitment. I'm going to be a better blogger! I want to improve my writing, share my love of crafts, baking, etc. and the joy that I find in practicing my faith. And, with all of that, I hope to encourage other young mothers, bloggers, ladies,..all souls in whatever way I can through this blog as well.
If you are a young wife and mother and want to know what to get from this post...find your spot to take some time to breathe, and shoot out a little prayer to heaven out of love now and then, not just prayers of need. Start the hunt for balance now, I will be hunting for it with you! Know that you are not alone in your daily struggles, and what you are doing, as long as you do it with love, is enough.

From one of my favorites, Fulton Sheen.
Have a good week! God bless!
Thursday, July 4, 2013
Simple and Cheap DIY's for the 4th of July
On a budget? Yeah, me too. And that can be really hard around the holidays, especially when you love doing crafts and decorating...but, it can also inspire your creativity!
My husband and I both like saving money, but we both love gatherings, parties, game nights...I guess you could say we are both people persons :-)
Here are some easy and cheap DIYs I put together for this 4th of July

I thought I would show different ways you can work with some basic things, some you might already have around the house!
1. My big DIY for the 4th - This Paperclip Flag Wreath. I only Spent $1!

I already had a pack of clothespins (It took 43 pins) and paint (I've had the paint since High School, believe it or not :P). I only spent $1 for the circular plaque in the middle.
(I'm guessing the clothespins might be around $5 for the big pack - I got them at Walmart quite a while back.. They come in handy all the time and are worth having some around...just look at the fun wreath I made with some of them! :D)
2. Red, white and blue rice + tea light

This one is really simple. I selected the glass I wanted to use, filled it with rice, and then divided up the rice as I wanted in 3 plastic cups. Add red color to one cup and mix well. Then add blue to another and mix well. The third cup remains plain. Pour them one on top of the other into your selected "candle holder" in the order you desire and whala! Just add the tea light and you are set!
3. Ways to display/set your silverware


You could decorate a jar by painting or using ribbon.
Makes a cute addition to your buffet table.


Or the simple, roll the silverware in the napkin...
(Or roll up the napkin and stick in the silverware like I did here, haha :-) )

4. Napkin fun...I chose a star...or flower? lol It is my attempt at a star anyway. :-)
I bought the flag fabric at Walmart for under $2 a yard and just cut big squares to make my napkins...sewing the edges will have to come later. I also still have some left over fabric that I have some ideas for.
There are more napkin folds with links on how-to on one of my earlier blogs here.

4. Use ribbon
You can spruce up just about anything with a little ribbon. :-) 
5. Red, white or blue dishes...even if they have a pattern of some kind, if they are in those colors then you can probably work them in ;-)
6. Paper Flowers
Top left are handmade paper flowers. I had the white ones and made the red.
7. Use some fabric in red, white or blue over your table as a runner or table cloth.

These are simple. It's not a huge collection of decorations, but they were fun and it was what I had time to do this year. The fun part is that I will be able to add to what I have every year and hopefully have a really fun assortment after a few years.
This shows what I made...I will show how I use them for the 4th festivities later and add the pics below :-)
Have a blessed Independence day!


Wednesday, July 3, 2013
Best Tabula Recipe EVER
My mom is an awesome cook. I have been blessed to have had her patience and skill in the kitchen guiding me growing up. Sometimes that patience and care can make an OK dish a "Wow, that's amazing" kind of dish. I think that Tabula is one of those dishes!
My mom has lots of amazing recipes, and as time passes, and I get more of the hang of married life and motherhood, I find I call her more and more about how she does this or that or what her secret was to making such-and-such recipe soooo yummy.
Well, for the 4th, I have decided to share some of my mother's skill along with one of our favorite family recipes, TABULA! It is seriously amazing! Even our extended family ask if we can make it when they visit!
We are not one of those families that likes to keep our favorite recipes a secret...we LOVE sharing them with everyone!
Tabula Salad
What you will need:

1 1/2 c. Bulgar Wheat
1 Bunch Green Onions
2 Cucumbers
3 Tomatoes
1 Bunch Parsley (Chopped FINELY!)
1/2 c. Oil
1/2 c. Lemon Juice
1 tsp. Salt
Mix all and let set for at least 2 hours, or overnight (I recommend overnight)
The secret to a really great Tabula? Chop EVERYTHING as FINE as you possibly can! It is time consuming, but will make a world of difference! A few more tips and tricks below :-)
These are pics I took earlier this afternoon :D
We are having this Tabula tomorrow!
Slice and dice that cucumber!


Onion


and those challenging tomatoes...

Now here is where that patience is really going to pay off. And one of the most important things that makes this Tabula so great. Pinch off the Parsley before you chop! You don't want the stems...they only make the Tabula seem stringy.

After you have pinched the whole bunch, grab and squeeze them together and chop them as fine as you can.


Combine Everything, and you are done! I flatten it out the top to help it absorb better, then just pop it into thee fridge. Refrigerate for at least 2 hours, or if you are able to then make it the day before you want to serve it so that all the flavors really come together.

And that's it! Well, it might not seem like much, but give yourself the afternoon to get all the chopping done ;-)
Enjoy!
Subscribe to:
Posts (Atom)